一、AQS是什么 java.util.concurrent.locks.AbstractQueuedSynchronizer,抽象队列同步器,是一个用来构建锁和同步器的框架。
常见的锁(如ReentrantLock)、同步器(如CountDownLatch、Semaphore、CyclicBarrier)都是基于AQS来构建的。
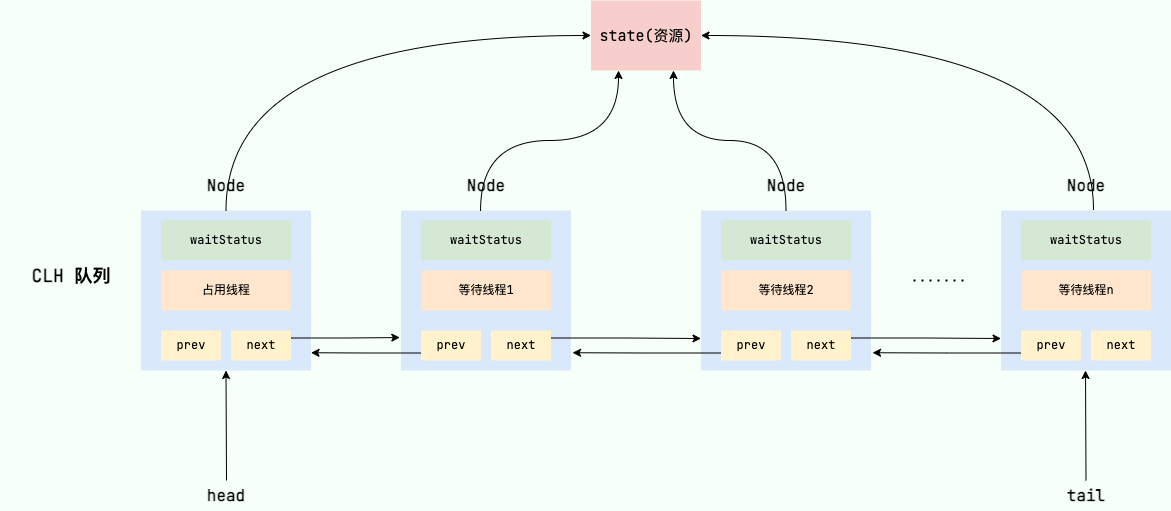
二、了解AQS 核心数据结构 1 2 3 4 5 6 7 8 9 10 11 12 13 14 15 16 17 18 19 20 21 22 private volatile int state;private transient volatile Node head;private transient volatile Node tail;0 :初始化默认值1 :表示线程获取锁的请求已经取消了2 :表示节点在等待队列中,节点线程等待唤醒3 :当前线程处在SHARED情况下,该字段才会使用1 :表示线程已经准备好了,就等资源释放了
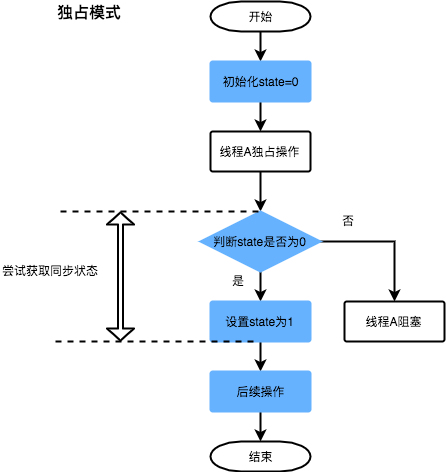
核心思想 如果被请求的共享资源空闲,就将当前请求资源的线程设置为有效的工作线程,将共享资源设置为锁定状态;
如果共享资源被占用,就需要一定的阻塞等待唤醒机制来保证锁分配。这个机制主要用的是CLH队列的变体实现的,将暂时获得不到锁的线程加入队列中。
三、源码-以ReentrantLock为例 3.1 lock
1 2 3 4 5 6 7 8 9 10 11 12 13 14 15 16 17 18 19 20 21 22 23 24 25 26 27 28 29 30 31 32 33 34 35 36 37 38 39 40 41 42 43 44 45 46 47 48 49 50 51 52 53 54 55 56 57 58 59 60 61 62 63 64 65 66 67 68 69 70 71 72 73 74 75 76 77 78 79 80 81 82 83 84 85 86 87 88 89 final boolean nonfairTryAcquire (int acquires) {final Thread current = Thread.currentThread();int c = getState();if (c == 0 ) {if (compareAndSetState(0 , acquires)) {return true ;else if (current == getExclusiveOwnerThread()) {int nextc = c + acquires;if (nextc < 0 ) throw new Error ("Maximum lock count exceeded" );return true ;return false ;final void lock () {if (compareAndSetState(0 , 1 ))else 1 );protected final boolean tryAcquire (int acquires) {return nonfairTryAcquire(acquires);public final void acquire (int arg) {if (!tryAcquire(arg) && acquireQueued(addWaiter(Node.EXCLUSIVE), arg))final boolean acquireQueued (final Node node, int arg) {boolean failed = true ;try {boolean interrupted = false ;for (;;) {final Node p = node.predecessor();if (p == head && tryAcquire(arg)) {null ; false ;return interrupted;if (shouldParkAfterFailedAcquire(p, node) &&true ;finally {if (failed)private Node addWaiter (Node mode) {Node node = new Node (Thread.currentThread(), mode);Node pred = tail;if (pred != null ) {if (compareAndSetTail(pred, node)) {return node;return node;private static boolean shouldParkAfterFailedAcquire (Node pred, Node node) {int ws = pred.waitStatus;if (ws == Node.SIGNAL)return true ;if (ws > 0 ) {do {while (pred.waitStatus > 0 );else {return false ;
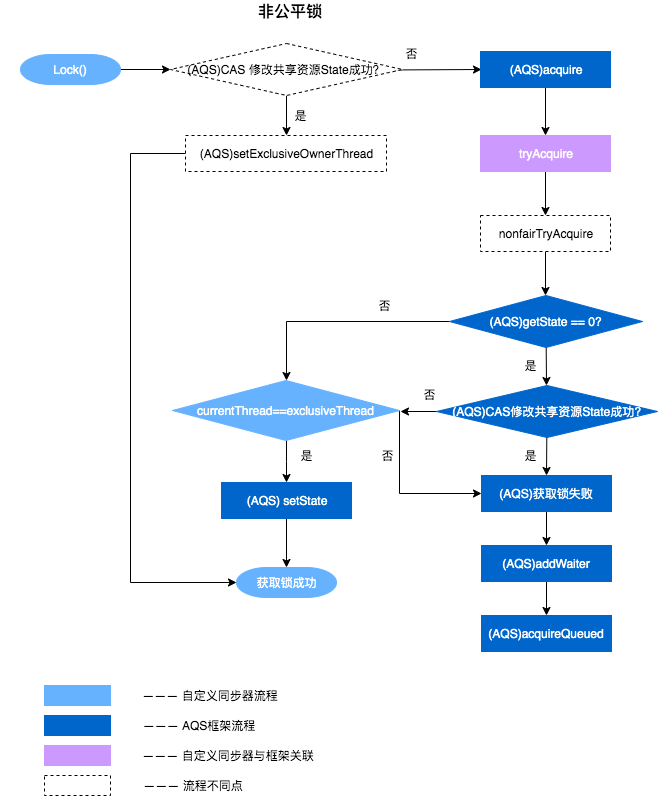
可以看到加锁流程分为几步:
compareAndSetState(0, 1),非公平锁,先尝试直接获得锁acquire 1tryAcquire 1
判断当前锁是否被占有,如果未被持有则尝试获得锁,如果被当前线程持有则计算重入次数,放在state上
如果这一步获得锁失败,则进入下一步
addWaiter(Node.EXCLUSIVE)
通过CAS尝试往队列尾部加一个新的节点(如果队列为空,初始化将head设置为一个空节点)
acquireQueued
有一个循环逻辑,首先是尝试获得锁,需要node是第一个节点
然后判断是否需要挂起(通过LockSupport.park避免空转)
加锁流程到这里就结束了,最终的结果是线程获得了锁或者获取锁失败被放入等待队列,
acquireQueued会把放入队列中的线程不断去获取锁,直到获取成功或者不再需要获取(中断)。
这里不会一直for循环空转,满足条件(节点的waitStatus = -1)时会将线程挂起,所以我们dump线程的时候,等待的线程一般会看到是WAITING状态,就是由于这个park。
3.2 unlock 1 2 3 4 5 6 7 8 9 10 11 12 13 14 15 16 17 18 19 20 21 22 23 24 25 26 27 28 29 30 31 32 33 34 35 36 37 38 39 40 41 protected final boolean tryRelease (int releases) {int c = getState() - releases;if (Thread.currentThread() != getExclusiveOwnerThread())throw new IllegalMonitorStateException ();boolean free = false ;if (c == 0 ) {true ;null );return free;public final boolean release (int arg) {if (tryRelease(arg)) {Node h = head;if (h != null && h.waitStatus != 0 )return true ;return false ;private void unparkSuccessor (Node node) {int ws = node.waitStatus;if (ws < 0 )0 );Node s = node.next;if (s == null || s.waitStatus > 0 ) {null ;for (Node t = tail; t != null && t != node; t = t.prev)if (t.waitStatus <= 0 )if (s != null )
解锁分为这几步:
减少重入次数,如果剩余重入次数>0,说明锁还被当前线程持有,下面只分析重入次数=0的场景
设置当前线程为空,锁已经被释放了
唤醒队列中第一个waitStatus < 0的节点
四、看看CountDownLatch 1 2 3 4 5 6 7 8 9 10 11 12 13 14 15 16 17 18 19 20 21 22 23 24 25 26 27 28 29 30 31 32 33 34 int count) {int getCount () {return getState();protected int tryAcquireShared (int acquires) {return (getState() == 0 ) ? 1 : -1 ;protected boolean tryReleaseShared (int releases) {for (;;) {int c = getState();if (c == 0 )return false ;int nextc = c-1 ;if (compareAndSetState(c, nextc))return nextc == 0 ;public boolean await (long timeout, TimeUnit unit) throws InterruptedException {return sync.tryAcquireSharedNanos(1 , unit.toNanos(timeout));public void countDown () {1 );
通过state来进行计数,await上阻塞的线程会进入队列。
五、总结
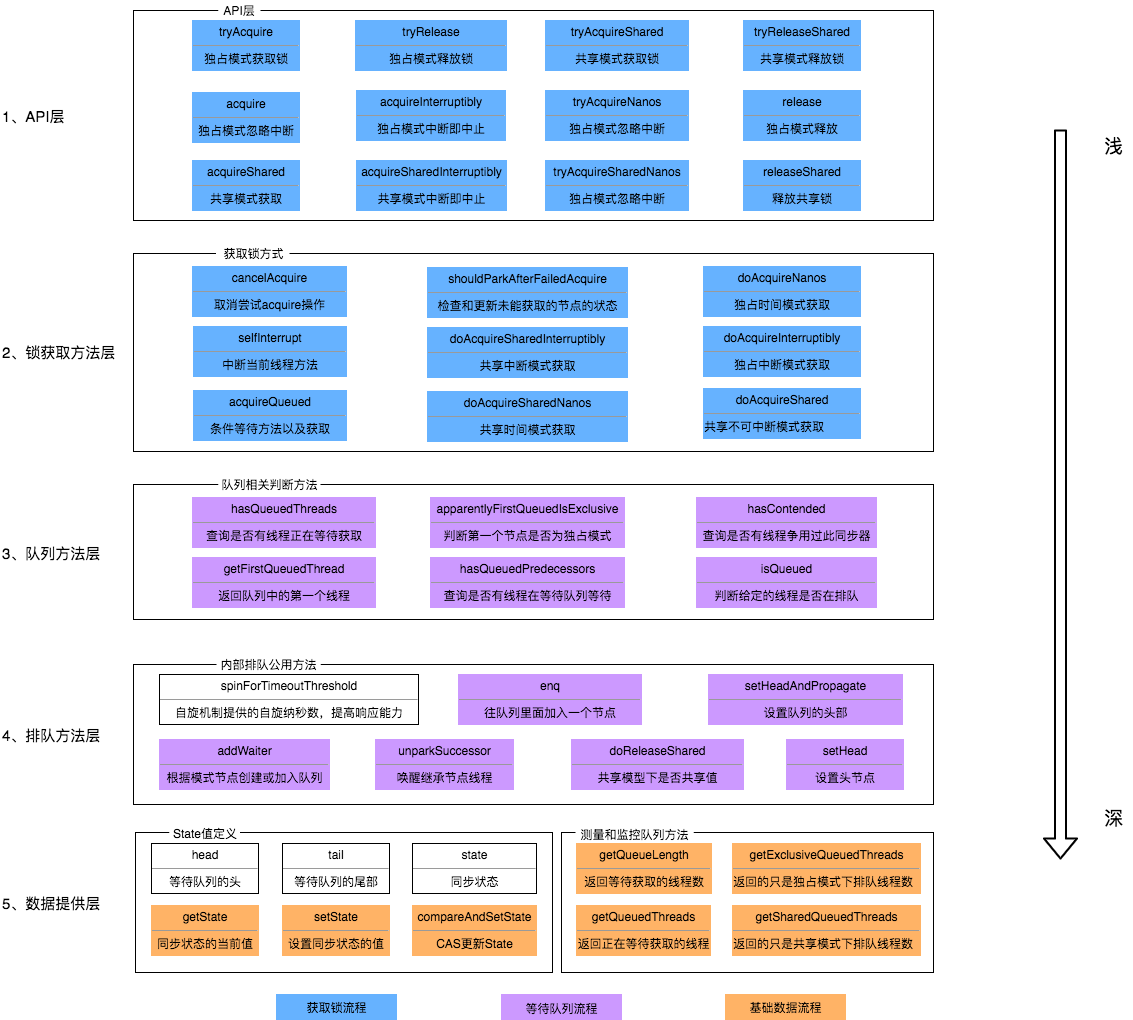
总的来说,AQS框架共分为五层,自上而下由浅入深,从AQS对外暴露的API到底层基础数据。
当有自定义同步器接入时,只需重写第一层所需要的部分方法即可,不需要关注底层具体的实现流程。当自定义同步器进行加锁或者解锁操作时,先经过第一层的API进入AQS内部方法,然后经过第二层进行锁的获取,接着对于获取锁失败的流程,进入第三层和第四层的等待队列处理,而这些处理方式均依赖于第五层的基础数据提供层。
六、参考资料 https://tech.meituan.com/2019/12/05/aqs-theory-and-apply.html


