背景 多线程并发编程是开发高并发系统的基础,利用好多线程机制可以大大提高系统整体的并发能力以及性能。
从底层来说,
单核时代:多线程主要为了提高单进程利用CPU和IO的效率。
假设只运行了一个线程,请求IO的时候,如果只有一个线程,那么这个线程被IO阻塞则整个进程被阻塞。
如果运行了多个线程,当一个线程被IO阻塞时,其他线程还可以继续使用CPU。
多核时代:多线程主要为了提高进程利用多核CPU的能力。
如果只用一个线程,只会有一个CPU核心被利用到。
创建多个线程,这些线程可以被映射到底层多个CPU上执行,显著提高任务执行的效率。
使用并发编程的代价:
不合理的使用无法提高程序运行速度
可能内存泄漏
可能死锁
线程不安全
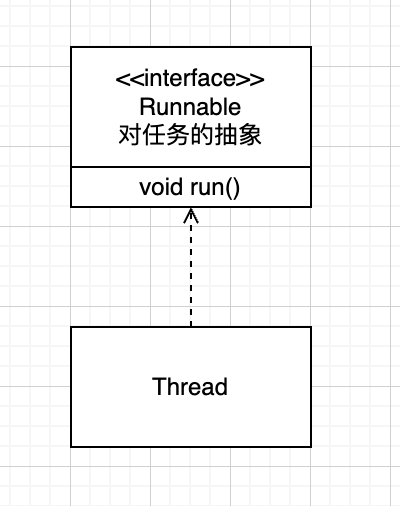
Java线程模型 Thread & Runnable 使用 Thread 类 想要使用多线程,首先需要一个“线程类”, Java提供了Thread类和Runnable接口来实现多线程。
Thread: 线程类。
Runnable: 函数式接口,只有一个 run() 方法,对任务的抽象。
1
2
3
4
5
6
7
8
9
10
11
12
13
14
15
16
public class Demo {public static class Job implements Runnable {@Override public void run () {"MyThread" );public static void main (String[] args) {new Thread (new Job ()).start();new Thread (() -> {"Java 8 匿名内部类" );
注意要调用 start() 方法,线程才算启动。
虚拟机会为我们创建一个线程,然后等到这个线程得到时间片时调用 run() 方法。
Thread 类构造方法 1 2 3 4 5 6 7 8 9 10 11 12 13 private void init (ThreadGroup g, Runnable target, String name, long stackSize, AccessControlContext acc, boolean inheritThreadLocals) public Thread (Runnable target) {null , target, "Thread-" + nextThreadNum(), 0 );ThreadLocalMap threadLocals = null ;ThreadLocalMap inheritableThreadLocals = null ;
挨个解释一下入参
ThreadGroup g 线程组,指定这个线程在哪个线程组下。默认继承父进程的。Runnable target 要执行的任务String name 线程的名字long stackSize 线程的栈大小。(一般不需要指定;即使指定了JVM也不一定听你的)AccessControlContext acc 不用。不关注。boolean inheritThreadLocals是否从父进程那里继承inheritableThreadLocals, Mtrace 基于这个实现。
实际使用时一般只调用两个基础的构造方法。
1 2 Thread(Runnable target)
Thread 关键方法 1 2 3 4 5 6 7 8 9 10 11 12 13 14 15 16 17 18 19 20 public static native void sleep (long millis) throws InterruptedException;public static native Thread currentThread () ;public final native boolean isAlive () ;public void interrupt () public synchronized void start () public void run () {if (target != null ) {public final native void wait (long timeoutMillis) throws InterruptedException;public final synchronized void join (final long millis)
挨个解释一下
sleep native 方法,让出时间片,进入TIMED_WAITING状态,用于暂停执行;currentThread 静态方法,获取当前线程isAlive() native方法,调用了 start() 方法 且还没有结束interrupt() 中断start() 启动线程run() 任务。一般使用一个 Runnable 变量解耦线程对象和线程任务wait() Object类的方法。必须在同步块内调用。让出当前锁,放弃时间片,用于和其他线程之间的通信join() 和fork 相对,调用方阻塞并等待被调用方结束。内部通过 wait()方法实现
Thread 生命周期 Java线程在运行的生命周期中的某一时刻只可能处于下面6中状态的其中一个状态:
NEW:初始状态,被创建出来还没被调用start()
RUNNABLE:运行状态,线程被调用了start()等待运行的状态。
BLOCKED:阻塞状态,需要等待锁释放。
WAITING:等待状态,表示该线程需要等待其他线程做出一些特定动作(通知或中断)
TIMED_WAITING:超时等待状态,在指定的时间自行返回,而不像WAITING一直等待
TERMINATED:终止,表示已经运行完毕。
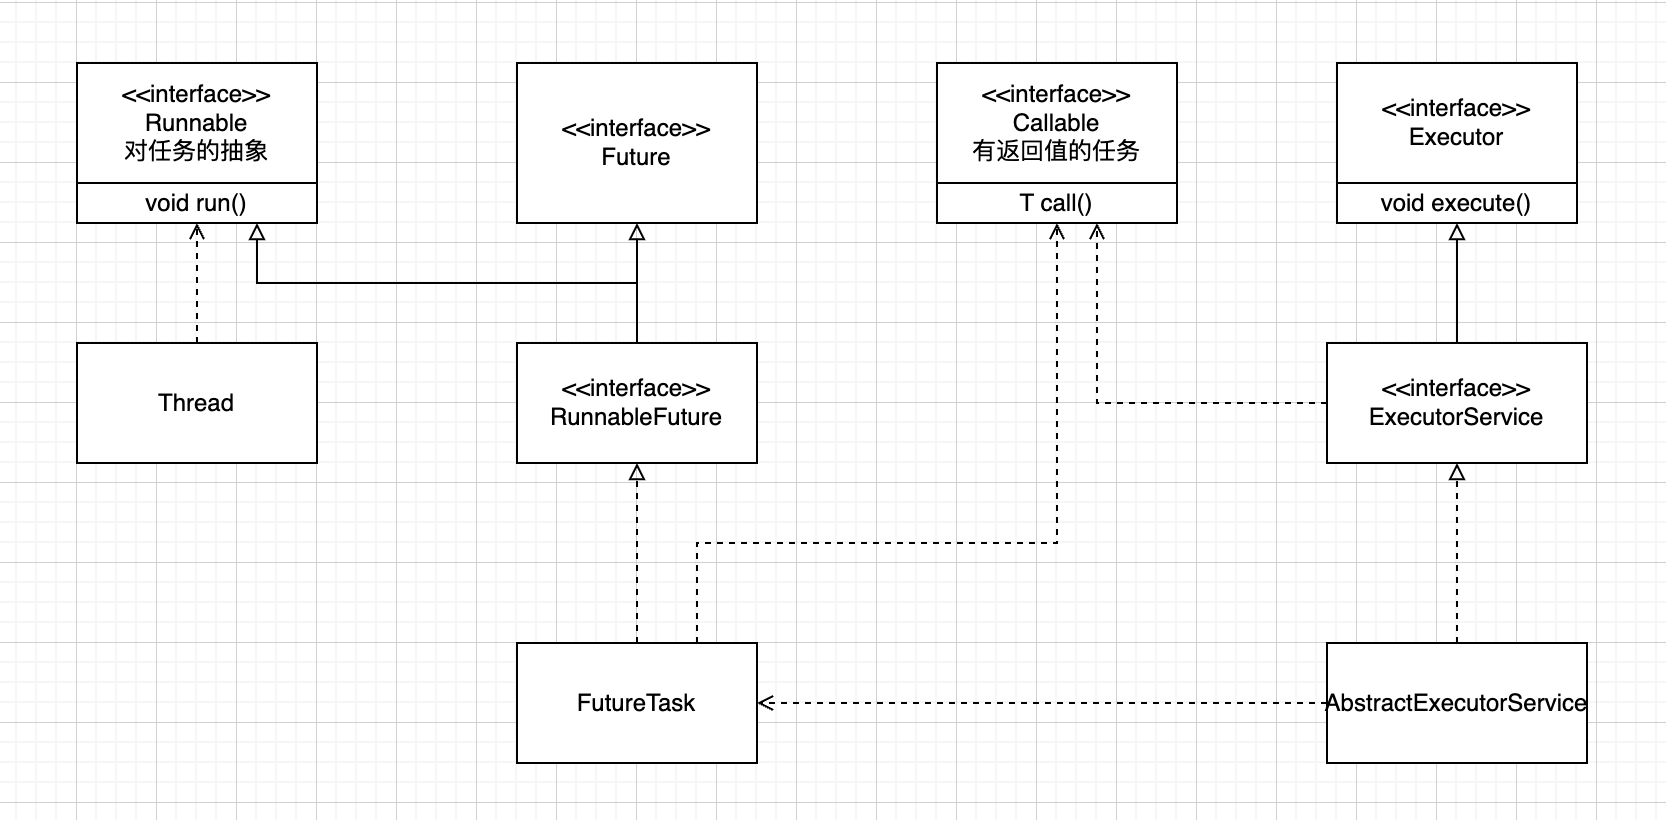
至此,涉及的模型如下
Callable & Future 上面使用 Runnable 有一个关键问题,就是 run() 方法是没有返回值的。
我们有时候需要线程帮我们执行一些任务,而且这些任务是有返回值的。
Java 提供了 Callable 接口和 Future 接口来解决这个问题。
1 2 3 4 5 6 7 8 9 10 11 12 13 14 15 16 17 @FunctionalInterface public interface Callable <V> {call () throws Exception;public interface Future <V> {boolean cancel (boolean mayInterruptIfRunning) ;boolean isCancelled () ;boolean isDone () ;get () throws InterruptedException, ExecutionException;get (long timeout, TimeUnit unit) throws InterruptedException, ExecutionException, TimeoutException;
Callable 提供了一个有返回值的接口,使用上语义和 Runnable 类似。
Future 表示一个异步计算的结果,它提供了一些方法来检查计算是否完成,等待计算完成,并获取计算的结果。
通过线程池的一个例子看一下 这两个接口的使用
1 2 3 4 5 6 7 8 9 10 11 12 13 class Demo {public static void main (String args[]) throws Exception {ExecutorService executor = Executors.newCachedThreadPool();1000 );return 1 ;
这里线程池 ExecutorService 提供了一个 submit 方法,将一个 Callable 对象作为入参,可以得到一个 Future 对象,
后续通过 Future.get() 方法获得执行结果。
上面说了 Thread 最终是通过一个 Runnable 对象来指定任务,那么线程池传入一个 Callable 是如何转换的呢?
1
2
3
4
5
6
7
8
9
10
11
12
13
14
15
16
17
18
19
20
public interface Executor {void execute (Runnable command) ;public interface ExecutorService extends Executor { public abstract class AbstractExecutorService implements ExecutorService {protected <T> RunnableFuture<T> newTaskFor (Callable<T> callable) {return new FutureTask <T>(callable);public <T> Future<T> submit (Callable<T> task) {if (task == null ) throw new NullPointerException ();return ftask;
这里可以看到,execute 确实是以 Runnable 对象作为入参。
使用入参 Callable 作为构造参数获得了一个 RunnableFuture 对象,然后将它传入 execute() 方法
这里出现了两个新的类,看一下它们的定义
1 2 3 4 5 6 7 8 9 10 11 12 13 14 15 16 17 18 19 20 21 22 23 24 public interface RunnableFuture <V> extends Runnable , Future<V> {void run () ;public class FutureTask <V> implements RunnableFuture <V> {private Callable<V> callable;private Object outcome;public FutureTask (Callable<V> callable) {this .callable = callable;public FutureTask (Runnable runnable, V result) {this .callable = Executors.callable(runnable, result);public void run () {public V get () {return outcome;
可以看到 RunnableFuture 接口继承了 Runnable 接口 和 Future 接口, FutureTask 是它的一个实现类。
FutureTask 把 Callable 对象包装成了一个 Runnable 任务,传入了 Executor
线程模型现在变成了这样,引入了可获得任务结果的能力和简单提到了线程池。
Executor 上面提到了线程池。
为什么使用?有什么好处?
创建/销毁线程需要消耗系统资源,线程池可以复用已创建的线程 。
控制并发的数量 。并发数量过多,可能会导致资源消耗过多,从而造成服务器崩溃。(主要原因)可以对线程做统一管理 。
ThreadPoolExecutor 的使用 上面有一个demo,调用 submit 方法,或者在不需要返回值时调用 execute
1 2 3 4 5 6 public <T> Future<T> submit (Callable<T> task) {if (task == null ) throw new NullPointerException ();return ftask;
ThreadPoolExecutor 的构造方法 Java中的线程池顶层接口是Executor接口,ThreadPoolExecutor是这个接口的实现类。
1 2 3 4 5 6 7 public ThreadPoolExecutor (int corePoolSize, int maximumPoolSize, long keepAliveTime, TimeUnit unit, BlockingQueue<Runnable> workQueue, ThreadFactory threadFactory, RejectedExecutionHandler handler)
挨个解释一下
corePoolSize 核心线程数
线程池中线程分为两种:核心线程和非核心线程。核心线程创建出来后什么都不干也会一直存活;非核心线程长时间闲置会被销毁。
maximumPoolSize 最大线程数
keepAliveTime 非核心线程最大闲置时间unit 上面这个参数的时间单位workQueue 阻塞队列threadFactory 【非必传】线程工厂,在创建线程时统一设置一些参数handler 【非必传】拒绝策略,指定任务被拒绝时的策略,默认抛出异常
ThreadPoolExecutor 核心任务处理逻辑 1 2 3 4 5 6 7 8 9 10 11 12 13 14 15 16 17 18 19 20 21 22 23 24 25 public void execute (Runnable command) {if (command == null )throw new NullPointerException (); int c = ctl.get();if (workerCountOf(c) < corePoolSize) {if (addWorker(command, true ))return ;if (isRunning(c) && workQueue.offer(command)) {int recheck = ctl.get();if (! isRunning(recheck) && remove(command))else if (workerCountOf(recheck) == 0 )null , false );else if (!addWorker(command, false ))
总结一下处理流程
线程总数量 < corePoolSize,无论线程是否空闲,都会新建一个核心线程执行任务(让核心线程数量快速达到corePoolSize,在核心线程数量 < corePoolSize时)。注意,这一步需要获得全局锁。
线程总数量 >= corePoolSize时,新来的线程任务会进入任务队列中等待,然后空闲的核心线程会依次去缓存队列中取任务来执行(体现了线程复用 )。
当缓存队列满了,说明这个时候任务已经多到爆棚,需要一些“临时工”来执行这些任务了。于是会创建非核心线程去执行这个任务。注意,这一步需要获得全局锁。
缓存队列满了, 且总线程数达到了maximumPoolSize,则会采取上面提到的拒绝策略进行处理。
ThreadPoolExecutor 如何做到线程复用? 我们知道,一个线程在创建的时候会指定一个线程任务,当执行完这个线程任务之后,线程自动销毁。但是线程池却可以复用线程,即一个线程执行完线程任务后不销毁,继续执行另外的线程任务。那么,线程池如何做到线程复用呢?
上面 execute 里面也只看到了 addWorker 就结束了,这个 Worker 是什么?它是怎么去执行任务的呢?
1 2 3 4 5 6 7 8 9 10 11 12 13 14 15 16 17 18 19 20 21 22 23 24 25 26 27 28 29 30 31 32 33 34 35 36 37 38 39 40 41 42 43 44 45 46 47 48 49 50 51 52 53 54 55 56 57 58 59 60 61 62 63 64 65 private boolean addWorker (Runnable firstTask, boolean core) {for (int c = ctl.get();;) {if (runStateAtLeast(c, SHUTDOWN)null return false ;for (;;) {if (workerCountOf(c)return false ;if (compareAndIncrementWorkerCount(c))break retry;if (runStateAtLeast(c, SHUTDOWN))continue retry;boolean workerStarted = false ;boolean workerAdded = false ;Worker w = null ;try {new Worker (firstTask);final Thread t = w.thread;if (t != null ) {final ReentrantLock mainLock = this .mainLock;try {int c = ctl.get();if (isRunning(c) ||null )) {if (t.getState() != Thread.State.NEW)throw new IllegalThreadStateException ();true ;int s = workers.size();if (s > largestPoolSize)finally {if (workerAdded) {true ;finally {if (! workerStarted)return workerStarted;
这里出现了一个 Worker 类。
Worker类实现了Runnable接口,所以Worker也是一个线程任务。在构造方法中,创建了一个线程,线程的任务就是自己。
故addWorker方法中 t.start,会触发Worker类的run方法被JVM调用。
1 2 3 4 5 6 7 8 9 10 11 12 13 14 15 16 17 18 19 20 21 22 23 24 25 26 27 28 29 30 31 32 33 34 35 36 37 38 39 40 41 42 43 44 45 46 47 48 49 50 51 private final class Worker extends AbstractQueuedSynchronizer implements Runnable 1 ); this .firstTask = firstTask;this .thread = getThreadFactory().newThread(this );public void run () {this );final void runWorker (Worker w) {Thread wt = Thread.currentThread();Runnable task = w.firstTask;null ;boolean completedAbruptly = true ;try {while (task != null || (task = getTask()) != null ) {if ((runStateAtLeast(ctl.get(), STOP) ||try {try {null );catch (Throwable ex) {throw ex;finally {null ;false ;finally {
上面说到 addWorker 里核心逻辑其实是新建一个线程,将 worker 对象的 runWorker 方法作为线程的任务执行。
runWorker 方法中的核心逻辑就是
首先去执行创建这个worker时就有的任务(当执行完这个任务后,worker的生命周期并没有结束)
在while循环中,worker会不断地调用getTask方法从阻塞队列 中获取任务然后调用task.run()执行任务。
这样达到复用线程 的目的。只要getTask方法不返回null,此线程就不会退出。
再看一下 getTask 方法的实现
1 2 3 4 5 6 7 8 9 10 11 12 13 14 15 16 17 18 19 20 21 22 23 24 25 26 27 28 29 30 31 32 33 34 35 36 37 private Runnable getTask () {boolean timedOut = false ; for (;;) {int c = ctl.get();if (runStateAtLeast(c, SHUTDOWN)return null ;int wc = workerCountOf(c);boolean timed = allowCoreThreadTimeOut || wc > corePoolSize;if ((wc > maximumPoolSize || (timed && timedOut))1 || workQueue.isEmpty())) {if (compareAndDecrementWorkerCount(c))return null ;continue ;try {Runnable r = timed ?if (r != null )return r;true ;catch (InterruptedException retry) {false ;
核心线程的会一直卡在workQueue.take方法,被阻塞并挂起,不会占用CPU资源,直到拿到Runnable 然后返回(当然如果allowCoreThreadTimeOut 设置为true,那么核心线程就会去调用poll方法,因为poll可能会返回null,所以这时候核心线程满足超时条件也会被销毁)。
非核心线程会workQueue.poll(keepAliveTime, TimeUnit.NANOSECONDS) ,如果超时还没有拿到,下一次循环判断compareAndDecrementWorkerCount 就会返回null,Worker对象的run()方法循环体的判断为null,任务结束,然后线程被系统回收 。
至此,线程模型变成这样:
CompletableFuture Future在实际使用中有一些局限,比如不支持异步任务的编排组合、get()方法是阻塞的等
Java8 引入CompletableFuture来解决这些缺陷。
CompletableFuture提供了增强的Future特性,还提供了函数式编程、异步任务编排组合等能力。
CompletableFuture 的构造方法 1 2 3 4 public static <U> CompletableFuture<U> supplyAsync (Supplier<U> supplier) ;public static <U> CompletableFuture<U> supplyAsync (Supplier<U> supplier, Executor executor) ;public static CompletableFuture<Void> runAsync (Runnable runnable) ;public static CompletableFuture<Void> runAsync (Runnable runnable, Executor executor) ;
不指定线程池的话,就会使用公共的ForkJoinPool
CompletableFuture 的常用方法 1 2 public static CompletableFuture<Void> allOf (CompletableFuture<?>... cfs) ;public CompletableFuture<T> exceptionally (Function<Throwable, ? extends T> fn) ;
附:阻塞队列 下面还没写。。还在草稿
线程同步 & 通信 AQS 线程安全 CPU会对内存变量进行缓存。持有变量的一个“副本”。
实际执行时对变量的副本进行读写,就会出现不一致的情况。
使用关键字volatile修饰变量,就可以保证变量的可见性(即禁用CPU缓存)
volatile关键字还会禁止指令重排序,以双重检验锁实现单例来看:
1 2 3 4 5 6 7 8 9 10 11 12 13 14 15 16 17 18 19 20 public class Singleton {private volatile static Singleton uniqueInstance;private Singleton () {public static Singleton getUniqueInstance () {if (uniqueInstance == null ) {synchronized (Singleton.class) {if (uniqueInstance == null ) {new Singleton ();return uniqueInstance;
uniqueInstance = new Singleton()这段代码分为三步执行
为uniqueInstance分配内存空间
初始化uniqueInstance
将uniqueInstance指向分配的内存地址
执行顺序可能变成1 -> 3 -> 2。多线程环境下可能会造成一个线程获得还没有初始化的实例
ThreadLocal 背景:给线程搞点自己的专属本地变量。
原理:
1 2 3 4 5 6 7 8 9 public class Thread implements Runnable {ThreadLocalMap threadLocals = null ;ThreadLocalMap inheritableThreadLocals = null ;
1 2 3 4 5 6 7 8 9 10 11 12 13 14 15 16 17 18 19 20 21 22 23 public T get () {Thread t = Thread.currentThread();ThreadLocalMap map = getMap(t);if (map != null ) {Entry e = map.getEntry(this );if (e != null ) {@SuppressWarnings("unchecked") T result = (T)e.value;return result;return setInitialValue();public void set (T value) {Thread t = Thread.currentThread();ThreadLocalMap map = getMap(t);if (map != null ) {this , value);else {
参考资料 http://concurrent.redspider.group/article/01/2.html


